Power BI Reports Installation
Once you have the required permissions enabled by your Power BI Administrator as mentioned in the “Power BI Admin Setup Guide”, please follow below steps to install Power BI Reports through:
Install Template App
- Go to the Template App URL (Shared with you on mail)
- You will see this notification as shown below, click on Install.
- When the installation finishes successfully, a notification tells you that your new app is ready.
You can click on the “Go to App” and access the reports.
- You can also access this installed app anytime by clicking on “Apps” Folder visible in left pane within Power BI navigation window as highlighted below.
- You will see the app present in the Apps folder where you can see all the details such as Version as shown in the screenshot below.
- And once the app is installed, you will also see a new workplace gets created in your Power BI when you go to Workspaces tab in left navigation pane as shown below. (Workspace name is ending with the suffix –“Date time stamp of the App installation″)
- You can access the Power BI report through Apps or the new Power BI workspace which got created.
Connect to Data
For the first time, you will see the App is installed with Sample Data. In order to connect the App to your data, you need to follow the below instructions.
- Once you click on Go to app as mentioned in Step 1.3 above. The app opens, showing sample data.
- Select the Connect your data link on the banner at the top of the page.
- This link opens the parameters dialogue, where you need to enter the below details shared with you.
storageAccountName- (shared with you)
fileSystemName- (shared with you)
When you click on the Advanced dropdown in the above dialogue box and scroll it down, make sure the toggle is on- This will automatically refresh the data in your report daily at midnight.
- Click on Next. Make sure OAuth2 – Authentication method and “Organizational” – Privacy Level Setting, is selected. You won’t have access to reports if you select any other method.
In case Privacy level setting is not set to “Organizational”, then click on the Edit icon as shown in the below screenshot marked as 1 and change the privacy setting to “Organizational”.
- Click on “Sign in and Connect”, the connection process starts. A banner informs you that the data is being refreshed and that in the meantime you're viewing sample data.
- Once Sign in is successful, you will be able to see the Power BI Report on your real-time data.
The “Installation”, “Connect to Data” steps are one time and first time. Once the workspace is created and the app is installed, you can directly see your data in the Power BI reports.
Common Errors and Their Fix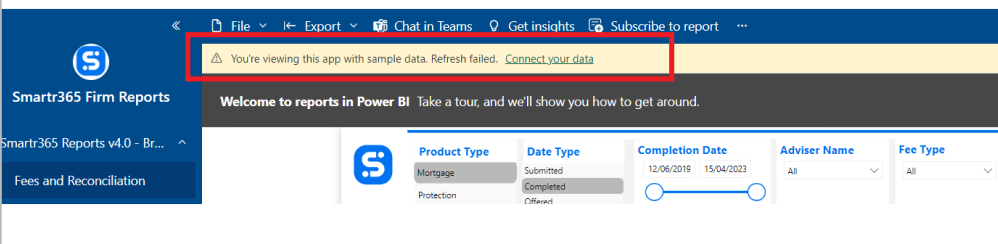
If you see such errors on the top such as Refresh Failed, please verify the following:
Verify the Dataset Credentials
- Go to Workspaces in the left navigation window -> Select the new workspace which got created.
- Click on the 3 dots next to Dataset link as shown below
- The dialogue box will open. Click on Settings
- On the Datasets Settings window which opens -> Expand Data Source Credentials -> You will see an error message there stating “Failed to test the connection” -> Click on Edit Credentials
- A Sign In dialogue box will open. Please select OAuth2 as Authentication Method and Organizational as Privacy Setting. Click on Sign In
- Once you click on sign in, it will open up a pop-up and will ask you to select your id where you will have to select your company’s MS 365 account which you used for Power BI login.
- After successful sign-in, you will see that the Error message is gone in “Data Source Credentials”.
- Now you can go again to the new Workspace created, and in the dataset, click on the Refresh button. Reports will be refreshed with your data without any errors.
Additional Features
Some of the extra features which the template App allows you to do.
Setup Schedule Refresh
By default, the data refresh will happen daily at midnight. But you can also set up Schedule Refresh on the dataset of your report to 8 times a day (with Power BI Pro license) or weekly, in your Dataset Settings as per your requirements.
- Go to Workspaces tab in left navigation -> Select your workspace -> Click on the Dataset-> Click on 3 dots and select Settings (Screenshots attached in 3.1 above) Under Dataset Settings, click on Schedule Refresh -> Below window will turn up and under Datasets tab, expand Schedule refresh.
- Now you can enable the Refresh toggle, setup the refresh frequency to Daily or Weekly, setup time, and can also add another time (upto 8 times a day)
Once you have set up, click on Apply. Now your schedule dataset refresh settings will be applied.
Comments
Please sign in to leave a comment.